
RACHEL PI: Difference between revisions
No edit summary |
No edit summary |
||
| Line 7: | Line 7: | ||
The RACHEL on Raspberry Pi project provides the means to run a server with shared, local content distributed via Wi-Fi or LAN where Internet access is unavailable or limited. | The RACHEL on Raspberry Pi project provides the means to run a server with shared, local content distributed via Wi-Fi or LAN where Internet access is unavailable or limited. | ||
See http://pi.worldpossible.org for more details. | See http://pi.worldpossible.org for more details. | ||
Demo RACHEL server: http://rachel.worldpossible.org | |||
== RACHEL Use by KoC == | == RACHEL Use by KoC == | ||
Latest revision as of 11:29, 7 September 2013
Last Updated: 09/07/2013 By: Randytate
About RACHEL
The RACHEL project, from http://worldpossible.org, provides downloadable content for use offline. Kids on Computers has used some of this content (e.g. offline Khan Academy Video collection) on individual laptops for past projects.
The RACHEL on Raspberry Pi project provides the means to run a server with shared, local content distributed via Wi-Fi or LAN where Internet access is unavailable or limited.
See http://pi.worldpossible.org for more details.
Demo RACHEL server: http://rachel.worldpossible.org
RACHEL Use by KoC
Materials Used (Sep 6, 2013)
KoC Raspberry Pi with RACHEL content, prepared to go to Nepal.
| Component | Item Used | Link | Cost |
|---|---|---|---|
| Computer | Raspberry Pi Kit Includes Pi, case, power adapter, and 4GB SD Card |
http://www.amazon.com/gp/product/B00B05NBDW/ | $84.29 May 4, 2013 |
| Case | (included in bundle) | ||
| Power Adapter | (included in bundle) | ||
| SD Card | Sony 32GB SDHC Class 10 | http://www.amazon.com/gp/product/B00B7ID99I | $18.90 Aug 22, 2013 |
| WiFi | USB 802.11n 150m Wifi Wireless Lan Network Card Adapter | http://www.amazon.com/gp/product/B007BWFXYS/ | $5.10 Aug 22, 2013 |
| Total: $108.29 |
How It Works
Setup
- Follow the instructions on http://pi.worldpossible.org to download the RACHEL Pi package, then load the image onto the SD card.
- Insert SD card into the Pi
- Initial start up
- Attach HDMI cable to Pi, and a monitor
- Connect ethernet cable to Pi, and to your home router (needs DHCP address)
- Connect USB keyboard to Pi
- Power up the Pi with micro USB connection
- Update. This will take several minutes, based on your bandwidth.
- (Default username is "pi" and password is "rachel")
- sudo apt-get update
- sudo apt-get upgrade
- sudo shutdown -h now
- Switch to Wi-Fi
- Disconnect ethernet
- Insert USB Wi-Fi adapter
- Disconnect and re-connect micro USB power connection
- Startup takes about 45 seconds
- If you still have HDMI connected, the console should report the Pi's IP address: 192.168.10.1
- If no IP address is shown, look for errors in the console (e.g. unsupported wi-fi adapter)
- The Pi is now acting as a Wi-Fi access point / hotspot and will give out a DHCP address to clients that join the "RPI" network
- Connect
- Using a laptop, tablet, ipod, or smartphone with Wi-Fi, look for and join the "RPI" wireless network
- Open a browser to http://192.168.10.1
- Browse HTML content (wikipedia and subset of OLPC), PDFs, and HTML5 video
- If your browser is HTML5 compliant, the video content should work
- There are a few parts of the content that appear to require Flash (?)
Pictures
-
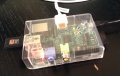
Raspberry Pi
-

Raspberry Pi, with wi-fi adapter, running on USB battery power. No wires needed.
-
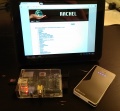
HP TouchPad, running CyanogenMod 9, connected wireless to "RPI" hotspot on Raspberry Pi, which is serving content from 32GB SD card
-
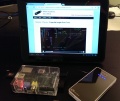
Watching Khan Academy video, served from RPI, in Chrome on HP TouchPad


